# Load your own files
# How to load your own files
Civillo provides users the ability to add their own layers to the map by uploading drawing, shapefiles, or CSV files. These layers persist across sessions however they are only available to the user who uploads them.
# Accessing user layers
To access user layers, open the side bar and click on the ![]() icon to open the layers panel.
icon to open the layers panel.
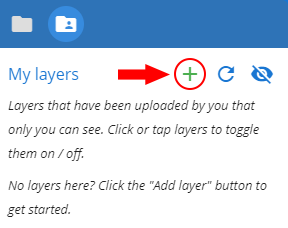
The default view of the layers panel is the project layers tab. To access the user layers tab, click on the ![]() user layers button.
user layers button.
# Creating a new layer
To create a new layer, select the ![]() icon at the top right of the user layers tab.
icon at the top right of the user layers tab.
The "Add layer" dialog will open.

You need to enter a unique name to help you identify your layer, followed by selecting the source file to upload.
So that your data can be positioned in the correct geographic location, you may need to select a spatial reference system for your data. The default selection "Auto-detect" will assume the source data has a spatial reference system matching the project it is being loaded into.
TIP
If you find that your data is not located in the correct location after uploading, you will need to select the correct spatial reference system.
Refer to spatial reference systems for more details.
# Allowed files
Specific information about each type of file format are explained in the What file types can I upload to Civillo? page. For user uploads, a maximum total file limit of 5MB is imposed.
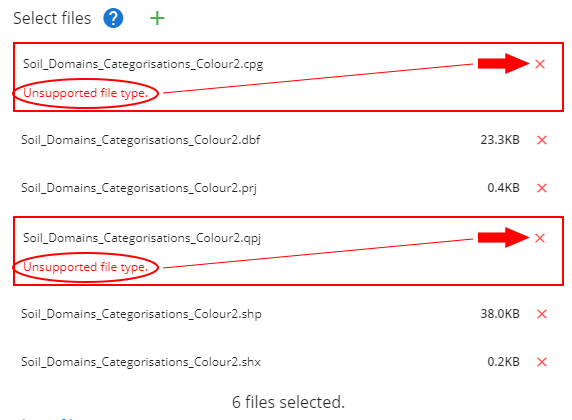
When selecting files, any types that are not supported, or files that are individually greater than the maximum allowed size, will be marked in red. These need to be removed before the upload process can commence. To remove files that are flagged as not supported, click or tap the red "x" button in the top right of the files row.
# Customisation
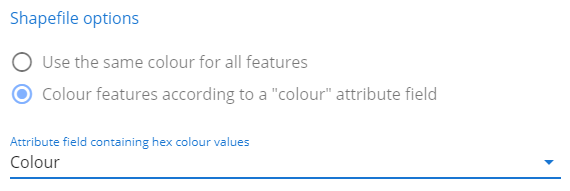
Whilst there is no way to adjust drawing files when uploaded this way (as their individual sublayer colours are taken directly from the data itself), there is a level of customisation permitted when uploading shapefiles.
As shapefiles do not support colouring of geometries natively, Civillo allows you to colour your uploaded shapefile geometries by either "Fixed" or "By attribute". Fixed allows you to select a colour for all the geometries (Default is black). By attribute allows you to select a field that contains hexadecimal (hash) colour values. When selecting geometry colour by attribute, each individual geometry will be coloured by the value in the selected field.
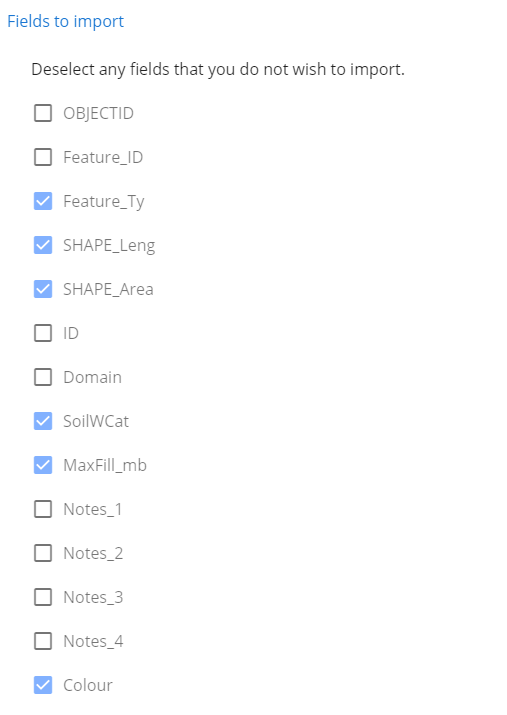
Customising a shapefile also allows you to selectively import which data fields will be imported (Default is all fields). Unticking the checkbox next to a field will remove that field from the import process. Attribute data will be displayed in the information tool panel when using the information tool and selecting a geometry.
# Submitting
When you have checked over your data and are happy with your selection, click or tap the "Submit" button in the bottom right of the dialog. If your submission is accepted, the source will be processed into the Civillo system. You can view the progress of your process in the user layers panel on the left.
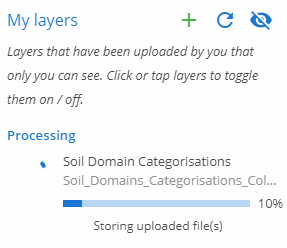
When the process hits 100% and is complete, the layer will appear in the user layer list for you to turn on and view.
# Processing Error
Sometimes there is a problem with the data you have uploaded. This could be causes by any number of unknown issues and is sometimes out of your control.

TIP
If you are having trouble getting a drawing file to upload or display correctly, the following can be done to help the file get through the processor and to a usable state.
In AutoCAD, purge the file - remove dead and unused links inside the file which can sometimes confuse the processor and cause it to trip up.
In AutoCAD, explode all blocks - converts all complicated types back to their primitive forms. Can sometimes help when a type causes some confusion for the processor.
Failed processes will continue to sit in your processing list until you remove them. To remove a failed process, click the icon next to the process details to see the process action dialog.
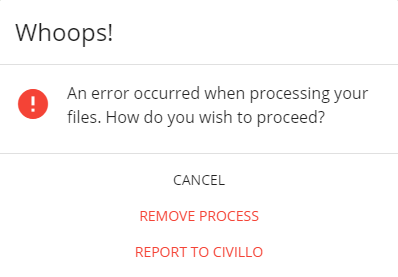
You can remove a failed process by clicking or tapping the "Remove Process" button in the action dialog.
If your data continues to fail to process, we can take a look for you. You can report the failed process to the Civillo team by clicking or tapping the "Report to Civillo" button in the action dialog. By doing this you are authorizing the Civillo team to review your data to try and ascertain why the layer is not processing and advise you on how to proceed. Please allow up to 48 hours for a response.